Sunday, May 26, 2013

Opening Week at OLRC

This was a long week. Not bad long, but long after having a month off. It's been a while since I've worked full-time. These are some pictures from the week. We have been getting Nunsense in order, which was quite the fiasco. The nun things that we had were 30+ years old, mis-matched, and really really nasty. We decided that because it is the first show, and as the other shows (mainly The Drowsy Chaparone) are going to be intense as far as building go, we would need to rent from somewhere else. everywhere in Utah that we contacted either rented nun things from somewhere else, or had them tied up in a show currently, so the amazing assistant designer of TDC drove to Idaho to BYU-I where he and his wife work, and got their things, and drove back. That's dedication.


This is Julia's "Millinery and crafts" corner. She is fabulous, and knows everything. 


This is a scary nun that was decapitated. 


This is my present. A wonderful new Bernina!

These are going to be a dress. Sequined Pashmina shawls from London. 


Some dresses that might be adjusted to be in TDC


Some friends.


A random tub of furs.


The designer was playing with some draping.


She even made matching orange and lemon earrings. Hilarious.


It was a long week. Back to work tomorrow!

Monday, May 20, 2013

Open Season!

Today was the first day of lyric, and i have to say i'm really excited. The new shop manager, Kris, is amazing. Although the shop is few in numbers, i feel like this summer is going to be a great opportunity to showcase some of my advanced sewing skills. Also, my old shop manager bought me a special present (for the shop) a brand new fancy-shmancy Bernina sewing machine, that will live in my personal sewing station for the summer. I'm very excited. I love learning new things and having opportunities to grow my skills. Check out the website for info on our shows and tickets. Come see the shows! It's the 100th year celebration!

(Photo credit: Spencer Potter, Lyric season 2012)

Friday, May 17, 2013

Easy Pillow Covers

My Aunt gave me this amazing rocking love seat when she was re-decorating.


I love it because it is so comfy, and i love free stuff. It reminds me of being at my Grandma's house, and one of the reasons it does is the amazing "old lady" floral upholstery which i do love, and it's in good shape but it's not exactly screaming to all the boys to come and marry us. More than anything it screams that the 22 and 24 year old who have it in their living room are actually 85 year old women... although honestly the candy jar and numerous house plants kind of say that too. In my efforts to "spruce-up" our cute little house i wanted something really easy. Virtually effortless, because I'm tired and i didn't want to spend the day sewing new covers. I remembered something I'd seen online.
This one i give complete credit to the Pinterest.
http://organizeyourstuffnow.com/wordpress/the-easiest-pillow-cover-ever
This is the link. Now, i realize this is a SEWING blog, and this tutorial is "no-sew" but honestly i did hand sew the knot and a couple other places because i didn't like the idea of it maybe coming undone, and we are not gentle with our pillows.


I just used two fabric scraps (and by scraps i mean... like a yard) that i had in my scrap drawer. They go with the current decor in our house and i think they turned out pretty cute for less than an hour of work! They even go nicely on the ottoman bench that i made and reupholstered. The best thing about this project is that if i get bored of them (which happens frequently) i can un-pick a couple little hand-stitched places, un-tie them, and they are back to being a (almost) yard of fabric. Done and done.  Now the "Shrewdle Shack" is lookin' pretty cute. 


(Shrewdle Shack is the name we gave our little house. Combination of the words "shrew" and "poodle". My roommate Jenessa is the former, and i am the latter... you kind of have to know us to get it) 
Go make some cute pillows. 

Thursday, May 16, 2013

Book Review: When Royals Wore Ruffles

When Royals Wore Ruffles: a funny & fashionable alphabet By: Chesley McLaren and Pamela Jaber
A couple of years ago i came across this book, and completely fell in love. Yes it is a children's book, but i learned a lot of really cool historical facts about clothing from it, plus it is adorable. The illustrations are SO incredibly cute. I would suggest this book to anyone with kids (boys or girls), or anyone interested in fashion or history.


http://www.amazon.com/When-Royals-Wore-Ruffles-Fashionable/dp/B0057DD2SC/ref=sr_1_1?ie=UTF8&qid=1368566817&sr=8-1&keywords=when+royals+wore+ruffles

I would recommend you check it out on Amazon because you can take a look at the first few pages and get an idea of how adorable the illustrations are.
The book talks about historical fashion fads like Flappers, makeup, corsets, perfume, Napoleon and his obsession with style, shoes, hats, wigs, bustles and more! Apparently Napoleon had the fireplaces in the palace boarded up to promote people wearing MORE clothing and furs. Basically it's just a really cute book that is also really fun and informative.

it's cheap on Amazon, so i would recommend picking it up. or see if your local library has it!

Wednesday, May 15, 2013

Bag Lady

When i was trying to think of simple sewing projects that i could post about, i immediately thought about totes. Making a tote bag is one of the simplest things to sew because it's all straight lines! The best thing about this project is that depending on your skill level, you can add on more advanced things like: a zipper closure, applique's, patchwork, screen printing, pockets, different handles, the possibilities are endless. For this example i will show you the basic steps, and maybe some of the more "decorative" add-ons. This tote bag is lined, which makes it look impressive, but in reality is really easy.

For the first step, you need to determine what size you want your tote to be. Think about the use for the bag and that might help. If you want to use it for a school bag, you probably want it to be large enough to hold a binder or a notebook and a school book, so measure your book or binder, add a couple inches, and that will be the size of your bag. If you want it for a purse, you might want it to be smaller. Other things you might consider making a bag for: church/scripture bag, beach bag (make a BIG tote!), grocery tote, etc.

The second step, you can make a paper pattern using the measurements you determined, or you can just trace the measurements right onto your fabric. You are going to cut 2 of the outside fabric, and 2 of the lining. You are also going to need handles, either make some out of fabric, or buy some handle webbing from the fabric/craft store.


I decided to add a pocket to mine because i had to seam the center of one of the outside panels. I just loved this cute vintage life preserver fabric so much! If you want pockets, inside or out, now would be the time to add them. 


So now you have your 4 rectangles. I serged the edges of all of mine. Lay them "right sides together", and pin, making sure you are leaving the top open, and the pocket facing up.


I decided on mine i wanted a little more visual interest, so i stitched and clipped the corners. If you did this the opposite direction and stitched down the corners (fold the bag so the bottom seam and the side seam are open and right sides together) it would make a bottom for the tote. I like doing that, but honestly i forgot on this one, so it's just a flat tote. 


I had some tan webbing that i thought would look nice with the blue. Cut the handles to the size you want.

Now you are going to put the whole thing together with one seam. Like magic. You can see what i did in this picture. Have the outside bag right side out, the lining inside-out, and put the outside inside of the inside-out lining. (that was a lot of words that sounded nonsensical!) Now take your handles and put one between the front two layers, and one between the back two layers, making sure to leave a little poking up. This will help make your handles sturdier. I like to pin one handle (making sure it's not twisted inside), then match up the back one with the front one's placement and pin it. You want your handles to match up. If you want to be a perfectionist, you can measure and mark in from the sides and the center front and back equal distances, then pin them to where you marked. 


When you sew, be careful as you go around. I always sew with one hand on top of the fabric, and one underneath. This way you can ensure that you are not getting puckers in your fabric. You need to leave a small hole, so don't sew quite all the way around. Now, my fabric is just a med weight cotton, but if you have a stiff fabric you are going to want to leave a bigger hole, or you are going to have a really hard time turning your bag. Once you have sewn all but your little hole, it's time for my favorite part! Pull everything out through that hole. Mine was a little tough with the heavy 2 layer pocket, but only for a second. Now your bag is all turned out.


This is the time i like to take and PRESS (iron) everything. I am the ironing queen. I LOVE it, and if you press as you go in any sewing project you will be happier with your progress. Any sewing project can be improved by taking the time to press your seams, darts, everything! You might hate ironing, but i promise you, it makes a world of difference. As you press the top, make sure you are folding under at the hole and pressing the seam allowance under. Now, you could just hand stitch that hole closed and you would be done, but i like to top stitch the top because it not only closes the hole, but it reinforces the handles and it just makes everything look finished. I do love me some nice top stitching. 


And now your bag is done! I added a ruffle to the top of my pocket because it was too boring for me. It actually still is... i think I'm going to screen print a big white anchor on the front of the pocket, and maybe i will do a screen printing tutorial! It's super fun and easy.


OK! It's all done... now go fill it with crap. :)


Tuesday, May 14, 2013

Pinterest Projects for the ADD in You

Ok, so we all know that sewing is my passion, but it's also a little bit of a compulsion. I think my compulsive sewing stems from being a little bit ADD and not being able to sit still, or work on projects for very long. I like projects that i can do QUICKLY. When i'm home at night relaxing, i like to do projects that i can do in less than an hour. It helps me to unwind and relax, while feeling kind of productive. Some of my favorite projects i have found on Pinterest. I have a link to my Pinterest on the top of my blog. If you go to my "projects ideas and inspiration" board you can find links to many of the things i have tried, but here are links to some of the ones i have been most impressed with:

This is one of those tricks that i was reminded of when i ran into it on Pinterest. This one doesn't link to a tutorial, but its super easy. I put some in some shirts i have that like to let my bra straps show, and they are amazing! Just use some twill tape or ribbon, snaps, and a needle and thread! http://pinterest.com/pin/89790586292730649/


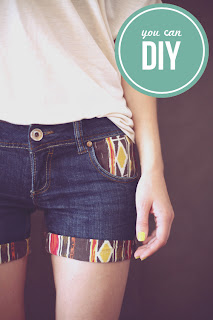
I think these shorts are SO cute. They are the perfect way to lengthen shorts, and adding the same fabric into the pockets helps it look intentional instead of like you just had to add length to your shorts. I would even add it to the back pockets. http://pinterest.com/pin/89790586292768434/


I love a good button-up. Some would say i have an obsession (I would say that) and button-up refashions are an idea that i adore. There are tons of ideas for them on Pinterest, but this one is especially cute and feminine. So go get a mens shirt and get to cutting! http://pinterest.com/pin/89790586292460053/


I have not used this tutorial for heating pads, but i like the seaming they did on theirs. They used lentils (weird) but i use corn feed. NOT POPPING CORN or you will have a disaster on your hands. The only thing about the corn feed is you have to buy a.. *cough 50 pound bag cough* so... do it and make gifts for everyone you've ever met. Or share a bag with a friend! Craft night! You have to get corn feed, like the mice on Cinderella steal from the chickens? Yes. Just sew up a shape whatever size you want, leaving a little hole open, fill half way with corn feed, and stitch up the end. then just pop it in the microwave and cramps be gone! and the plus? It smells like popcorn instead of the stinky rice ones. And the bonus is it doubles as an ice pack. Keep it in the freezer for instant headache relief.
http://pinterest.com/pin/89790586290308604/


And my favorite: the Bapron. The pattern is for personal use only, but make a bunch for your babies, baby showers for friends, or just make some for your cute cousins and their cute babies (what i do).
http://www.scribd.com/doc/54470577/CINO-Bapron-Tutorial
http://www.scribd.com/doc/54408904/bapron-pattern
the above link is to the free pattern (the original was free, but now she charges. this is the only place i could find it still for free.)

(All images from Pinterest) 

Now get to crafting! 


How to: Read a Fashion Pattern

I had a request for a blog post on this topic and at first i thought... would that really be that helpful? I quickly realized YES when i thought back to when i was learning how to sew. When i didn't have my mom or my aunt right there telling and showing me each step, reading a pattern was definitely one of the greatest sources of stress that accompanied sewing. Now i don't usually read instructions anymore, but sometimes i still do! For the most part, i dont need to read them because i've done most things many times, and i know how to put a garment together. The reason they are there is to HELP YOU LEARN. If you are a beginner, reading the instructions is SO important. Even if you aren't a beginner, but you are doing something you haven't ever done before reading the instructions is important. Instructions are put together by the company to show you the proper technical way to construct a garment. If you are learning to sew on your own this is probably one of the best ways for you to not be led astray into the "i'll just make it up as i go.." mentality. That is NOT a good way to learn, and you will end up with some really really bad sewing habits that will be hard to break. Better to start off learning the right way.
When you are buying a fashion pattern, you might think "oh, i'm a size 8 dress.. so i will get the 6,8,10,12.. pattern" and you would probably end up with a dress that was much too small if you made the 8. the thing with pattern sizing is you can't think of them like clothing sizes, because generally, they are not. when i go to a store i might be a size 6 or 8 dress, but generally i am more of a 10 or 12, maybe even a 14 in pattern sizing. patterns have a sizing chart on the back that include simple measurements like bust, waist, and hips. if you have these measurements memorized, or if you are like me and have a measuring tape in your purse at all times, you can find the right pattern size while you are still at the store. Look at the back of these patterns for example:

                          
The pattern on the left is for an apron and the meaurements are a little more general than you would find in something more fitted, but for example, i would want to make the size medium for me (14-16), and if i wanted to make the full apron i would then need 2 1/4 yards of fabric. The pattern on the right is for simple pajama top and pants. This pattern is actually unisex, and the size chart was actually on the flap... that i didn't get a picture of, but it says i would be a size medium. As you follow the medium sizing down vertically you see how much fabric you need for the different widths of fabric. Your fabric should say the widths on the end of the bolt at the store, but if you can't find it, ask someone, or get your measuring tape out of your purse... haha. Sizing is very important for more than just fit, but for choosing and buying fabric as well. The back of the pattern will tell you how much yardage you need for each size, and fabric withs. The top back of the pattern will also give you fabric suggestions. Choosing the right fabric for the project can mean the difference between failure and success. This is something SO important that i tell my kids in the Costume Shop all the time. If you choose a silky, flowy,  or "woodgy" fabric (woodgy is a term than we use to describe fabric that is very difficult to work with. It slides and moves when you try to cut it. It's difficult to keep doubled up, and is nearly impossible to keep something like stripes or plaids straight on. It can make a simple project very advanced.) If you choose a fabric that is difficult to work with, you could be an extremely skilled seamstress and still end up with a less than perfect end-product. I like to recommend things like cottons, flannels, and other non-stretchy or non-woodgy woven fabrics. knits can be really difficult to work with as you either need a good serger, or some products like a ball point needle, double needle, etc. Use the fabric suggestions that are on the back of your pattern to increase your success rate. 
These are just some thoughts i have had as i have worked with friends, students, and co-workers who were learning. Using a fashion pattern should be something that increases your confidence as a seamstress so don't let it scare you! Remember, if you ever have any questions about sewing/fashion e-mail me, or comment! I want you to succeed. I want you to build your sewing confidence! Now head to your local fabric store!

Friday, May 10, 2013

The Basics: Hems (pants)

One of the things that i am asked (and sometimes paid) to do is hem pants. Most often it is boys, helpless and clueless, who have dress pants that either 1. didn't come with a hem (which is sometimes the case if you buy them as part of a suit) or 2. are too long/short. Hemming is absolutely, without a doubt, the easiest thing i am asked to do. I charge between $10-$20 to hem pants (depending on if i do cuffs, if i like you, if i'm already busy and stressed..) and that is the easiest money i could make. Any place that does hemming would charge you more than that so... by doing this tutorial i would like to empower people (but hopefully not lose some of my income). ok, so... let me start by saying, there are multiple ways to hem a basic pair of pants. Depending on a number of factors, i can help you decide which way is best for you. Ask yourself the following questions: 1. Do i own/have access to a serger? 2. Do i want these pants to have/ or do they currently have a cuff? 3. Do i own/have access to a sewing machine? Now, if you answered yes to #2... you might have to hang tight. that's a post for another time. before i ask you about the other questions, i need you to TRY ON THE PANTS, or have the owner of the pants try them on. WITH SHOES. Think about what shoes you would be wearing with them. If they are too short, you should take them hem down (and make sure there is enough to be let down. dress pants usually have quite a large hem to be let down). With dress pants they need to have what we call a "break". when you stand, your pants should not be a solid column of straight fabric. they should look like this:

This image is perfect evidence of that. See the bottom? How there is a "break" in the line down the front of each leg? That is how pants should fit. Now, i know, these pants have a cuff...that doesn't matter in the case of length fit. The pants in the back will not really have a break. They should hit right about at the top of where the sole starts. You dont want them to drag, but if they are too short they will look stupid. So, estimating, probably about a half an inch to an inch off the ground. again, if you get the break right in the front, and hem straight all the way around, they should hit at the right place in the back.
Ok. whew. So, now you have your pants pinned to the right place. Take them off (yes.. yes. dont try to hem pants while wearing them. i've tried. it's a dumb thing to do.) Now back to my original questions. Do you have a serger? If yes, then if you had to cut off some of the length, make sure to leave probably 2 inches to hem up. You dont want a small hem in dress pants, or they will lay funny. If you had to cut some off, make sure you cut equal amounts off each leg (unless the person has incredibly different length legs), and serge the raw edges of the fabric. If you said no to the first question, you will have an extra step. You will need to have hem tape (It is NOT sticky. I dont condone any adhesives in sewing. It's basically just really thin ribbon. The package will say "hem facing tape" or something like that. Make sure it does not say anything about "iron on" or "adhesive" yuck!) and preferably pinking shears (the ones that cut a zig-zag). First use the pinking shears to "pink" the raw edges. this isn't quite as good as a serger, but it dramatically reduces the fraying of the fabric. If you dont have pinking shears, its ok... just skip that step. next you will sew the hem tape to the raw edge of the fabric.


You are just stitching it on, not making a seam. So you are not doing "right sides together" as is traditionally used for everything else in sewing. Next, fold the fabric up to where you had pinned before. I only have about an inch hem here... and it's ok. I guess it just depends on what you feel like leaving to hem up. If you do the hem nice, no one should be able to really tell if it's a one or two inch hem.

Pin it in place. Don't try to be a hero here, i always pin. Things will turn out better the first time if you pin. I've learned this lesson the hard way. Now, we start stitching. I'm doing a very very basic hemming stitch on this. Some people do different stitches, i dont do a fancy stitch for a basic hem. So, do whatever you want, or how you have learned. But this way is easy, i promise.


You are going to want to make sure your thread is not "doubled up". Only have a knot in one end of the thread, not knotted together. To start, take a small "bite" out of the fabric with the needle, then another small "bite" of the hem tape (or of the serged fabric edge) stay right on the edge of the hem tape. Small bite, small bite. Back and forth.


You may need to click on this picture for it to really be visible. I stitched in blue. It's going to be hard to see my stitching because that's how it should be. You don't want your stitches to be huge and visible, or they will show on the outside. The inside doesn't matter as much as the outside though, so make sure that when you are taking bites of the fabric, you are taking tiny tiny ones. The hem tape stitches wont show on the outside. Occasionally peek onto the "right side" of the pants and make sure your stitches are small and uniform. When you get to the end (or circle back around) take a "bite" and circle your needle through the loop your thread makes. That makes a knot. Make a couple more knots in the same spot. You dont want your beautiful new hem to come undone! Now turn it over and admire your work!


See the little blue specks? Maybe this was a poor fabric choice... but you get the idea! Now look at this example where i took way too big of bites. Look at the huge ugly stitches it makes on the outside.


Baxter doesn't like when i sew.


Ok! So i think that's it. To my sewing peeps, let me know if i forgot anything. To my beginner peeps, let me know if i need to clarify anything.

Thursday, May 9, 2013

Needle and Thread: A Blogging Endeavor

My name is Jennifer Cawley. I am 24 years old. I have my Bachelors degree, and i am currently trying to pursue my passion for sewing and fashion. Currently i do quite a bit of "freelance" sewing, i run an Etsy shop, and i work for Utah State Theatre sewing costumes.

I decided to start this blog for many reasons. In no certain order my reasons were: i needed an outlet to share the sewing and fashion knowledge that i have gained in my 24 years of life; i have an absolute passion for sewing, and i enjoy helping others to learn more about the things that i love; i was so sick and tired of seeing "fashion" or "sewing" blogs in which people "teach" how to sew... while not knowing correct techniques themselves, and making it up as they go.

I was taught how to sew from a very young age. So young, i dont remember actually learning, or the techniques my mom, aunt, and grandmothers used to teach me. I DO remember when i hated sewing. I DO remember being so frustrated with projects that they got thrown in a bag, or a drawer, never to see a sewing machine again. I remember trying to sew a new dress on Saturday night to wear to church the next day, and failing. I also remember when things finally started to "click" for me. It was only when i relaxed and did it for the fun of it, not stressing about it, or trying to decipher pattern instructions that i began to enjoy sewing. For me, that moment is something that changed my life, and my career path, but i always return back to the proper techniques and skills that i was taught. The basics. If you know the basics you can do just about anything.

I have worked for the past 4 year for the Utah State University Theatre Department in the Costume Shop. I had never before taken theatre classes, or done anything with theatre besides going to see shows, but i got the job because i could sew, and knew how to thread a serger. Working for the Theatre at a University has given me ample opportunity to work with students. Teach them, and see them struggle. I have also seen the despair, and the stress, confusion, the tears, the intensely low self-confidence that comes with seam ripping for hours and re-doing a project five times in a row. I have had to learn how to teach, and it has NOT come easily for me, but through this struggle i think i have learned things that i need to share: common problems, simple techniques, impressive things that are actually very simple to execute. Things that will hopefully build up any beginners' confidence in their abilities to learn. Even if you just want to learn some basic things like: how to sew a button back onto your shirt, or to hem pants by hand.

Some of the things i would like to share on this blog will include my behind-the-scenes working as the cutter/draper for the Old Lyric Repertory Company this summer. The process that we go through as we take a show's designs from renderings to the stage is quite a magical process, that i still find fascinating. I'm given opportunities to build incredible things like those in these pictures from last season at OLRC last summer:


(photo credit: Spencer Potter)

If anyone has suggestions of posts you would like me to do, please e-mail me, or comment. I will try to fill this blog with step-by-step pictures and instructions. I want this blog to be helpful, and informative.

--Jenny