Tuesday, June 18, 2013

French Seams


This is a really basic post and i know you could find a tutorial just like this on hundreds of sites, but i was doing this the other day and took pictures of my steps, so i thought i would share. It is a brilliant solution if you have a really sheer/woodgy fabric that needs a clean finish for the seams, don't have a serger and would like all your seams contained, or you have a really fray-y fabric that needs some extra attention.

First: Put the fabric wrong sides together. This is opposite of a normal seam, so be sure you consciously do it the wrong way. 


I like to clip my seam so that i can get a smaller finished seam. I recommend doing this. 


Look at me cutting with my cute Ginghers and cute orange nails... adorable. p.s. it's hard to take a picture when you are cutting with your dominant hand. 


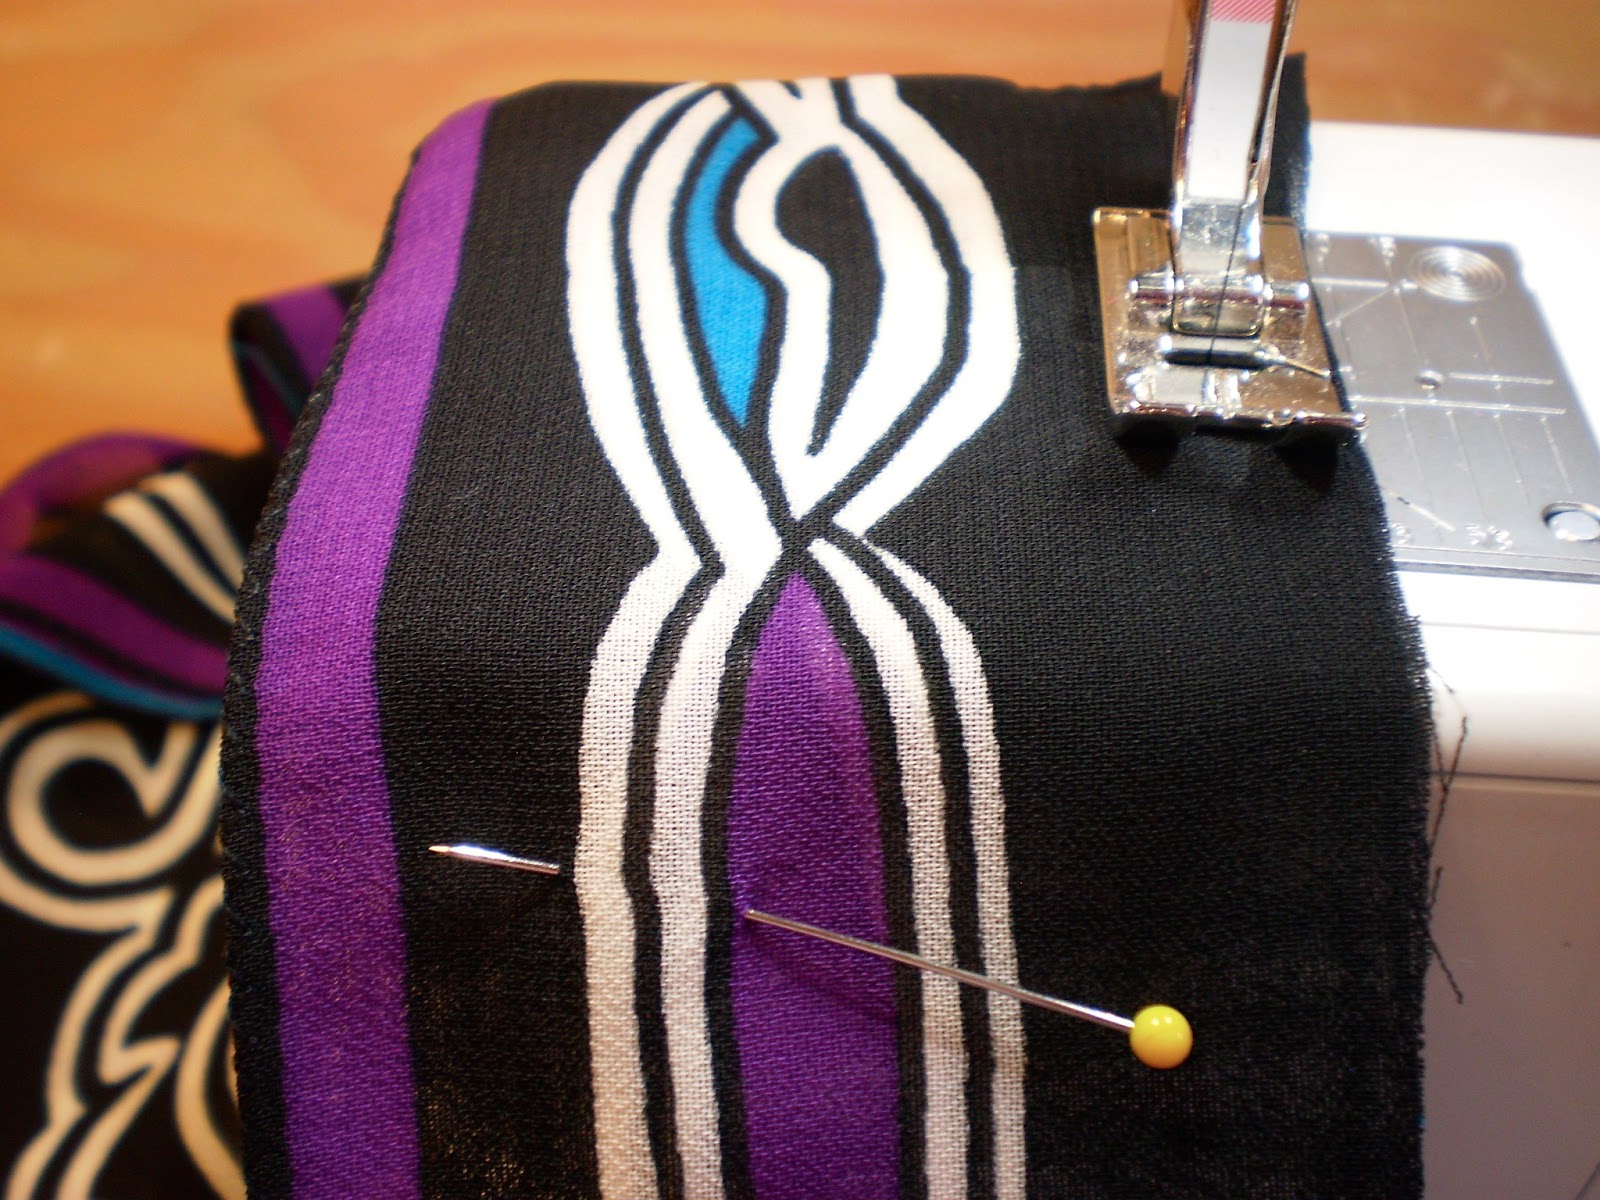
The next step is to turn your project to the "wrong" sides. Pin the fabric over again to make another seam. This step will contain all of the raw edges and will leave you with a clean, contained seam.


Stitching... see how this works? It's brilliant. 


Niiiice...


Make sure to match your patterns!! It bothers me that these ended up slightly off. But it was on the bias, so give me a break...


This was pre-pressing (the MOST important step in my opinion.), but you get the idea.

And now you know how to do something that sounds fancy, and looks fancier than a plain-jane seam... but is in reality very simple to execute. The hardest part is making sure that you do it wrong sides together first... i have accidentally done it right sides together so many times... and had a little quality time with my seam ripper... so check before you stitch!! 


Saturday, June 15, 2013

1 dress + 1 dress = 1 dress

So, i might be bad at math, but the title is the truth. I was cleaning out my closet when i found 2 dresses that i don't wear often. The grey dress was ugly, but cheap. I bought it because i thought it might be a comfy easy dress to wear... but i didn't wear it because it was ugly. The second dress was a coral tank dress that i got from Gap last summer that has since shrunk in length, and as i prefer to have more leg coverage than it was willing to offer i no longer wore it. So what did i do? I shoved them in my work bag to become inspired at the next days' lunch break. At work i have an hour for lunch, and i usually use about 10 of the 60 minutes on eating, and then i work on personal or paying alterations projects. Since i have been on a maxi dress kick lately, i thought why not combine these two comfy knit dresses into one mega-comfy color-blocked dress! Double trends in one. So i cut the coral dress off at the waist (which was just gathered by elastic) and i cut the hem off of the grey dress, and i stitched them together very carefully so that i didn't get a pucker-y seam (as is common in sewing knits). I loved that the coral dress had a grow-tucking detail at the bottom, so i kept it, and didn't need to re-hem it. It was fate that these two dresses live as one as they were the same exact circumference so i didn't have to take either one in for them to fit perfectly. In order to make the dress look more intentional, i cut the top of the coral dress into some matching asymmetrical neck ruffles to layer in with the existing ones. I'm still not pleased with the draw-string... but have yet to find ribbon or something sufficient in a color that i like... so it remains. Who decided to put a khaki colored draw-string in a grey dress to begin with?? Anyway... now i have this cute dress that took a total of 20 minutes to complete, and was the perfect thing to wear to work on a hot busy day! I highly suggest looking through your own closets and finding the things you never wear and decide if maybe it's time you try a re-fashion! 


P.S. Ignore the messy fitting room... 

Monday, June 10, 2013

Threads


Threads is a magazine that also has a website... and it is amazing. you can learn everything from the basics of sewing to really advances and amazing new techniques. check it out! http://www.threadsmagazine.com/  
I'm not being paid to do this spotlight, i just really believe that they are a valuable resource for anyone who loves sewing, or wants to learn more about sewing.


Sunday, June 9, 2013

*Sparkle*

So, for The Drowsy Chaperone the designer brought a whole bunch of fabrics back from his trip to London... and by fabrics... i mean Pashmina shawls that were covered in sequins and beading. He wanted this dress for "the Chaperone" made from 3 shawls. that's all i had to work with! It was a challenge worthy of Project Runway for sure. 


So i made a mock up out of rectangles cut to the exact size of the Pashmina's so that i could make the most of the fabric i was given. After the initial mock up i hacked into those shawls and lined each piece to protect the beading stitches on the inside from snagging (a major problem we had encountered). The actress has a lovely curvy full-figure, so making a 20's style dress that draped straight was a challenge. The 2 shawls for the skirt's width equaled only a couple inches more than the actress' fullest hip measurement, so i needed to utilize the entire width, as she does some dancing and such in this costume. 


The beginning stages were me trying to get the pleats on the skirt to drape nicely over the form, and working with the medallion and feathery pieces from a coordinating shawl to get a "capelet" effect. 


The designer wanted these side panels from the 3rd shawl. They give a "faux pannier" (what the assistant designer refers to it as) look that the 20's was known to do on occasion. 


Pinned in place. 


Still figuring out the back medallion..
Sometimes with this project i felt like the designer was so committed to the fabric, that we changed a lot in the design in order to work with this medallion.. such a pain.. but that's the designer's right i guess. 


So sparkly.


It made my whole corner of the shop like a disco ball in the mornings.


With the ruched top all pinned in place. This part was a lot of hand-stitching so that the ruching was perfect, and stayed that way. 


looking lovely.

Here are some other pictures of various stages of being pinned and/or stitched.


We decided to have the "feather" come down to the waist so that we weren't getting that "arrow to the chest" effect of having it come to a point at the top of the décolletage. 


More finished stages.


There is a drape-cape thing that goes over her arms that we tried to figure out using a hanger and an empty fabric tube. It's a lot-a-look.

The fitting with her went amazing and it looked much better on her form than on a male form that i padded out with a bra and batting... (man we need a plus-sized form!). I will post more pics on this project later. Needless to say that after the fitting the designer ate his words and retracted his previous comment that this was "quite possibly the most unflattering dress he had ever designed" and said that i did a beautiful job. The assistant designer (who i greatly trust and admire) complimented me twice on my construction and fit, and the actress gave me a hug, and a kiss on the cheek and said that she felt like a million bucks. This is why i do what i do. Making that actress feel like the most elegant fabulous person on the stage is why i keep going, even after discouraging comments. It's important to me to make everyone have that same feeling, whether they are stepping out on stage or walking out their front door. 


Wednesday, June 5, 2013

Renderings: The Drowsy Chaperone

These are some of the renderings from the designer for The Drowsy Chaperone. This gives you kind of an idea of what i have to work with when i start the patterning/draping process. 


This is the swimsuit/pants/robe combo outfit. 


This one is an optical illusion... it took me hours to figure out why it wasn't making sense... 2D and 3D are two very different things.


Monkeys! Luckily i made a whole bunch of red military coats a couple years ago for Our Country's Good that we will be utilizing for these costumes. 


This is the "sparkle" dress for the Chaperone (what i call it). I will show you some pics of that later... it's pretty intense.


We hang them on the wall for inspiration. 


Tuesday, June 4, 2013

The Process: Deco Dressing Robe


Sometimes working in the shop is hard... on my OCD. When the shop has 10 racks and 15 dress forms strewn amidst 4 tables... *shudder*. I'm a creative minded person, but i also don't create well in chaos. Needless to say i hard-core cleaned the shop after this picture was taken... my boss was very grateful. 


"The process" is something i wanted to highlight on this blog, because i'm still amazed by it. I was given a rendering, and a measurement sheet, and i went to town! my usual process is that i do some draping on a form that i've padded out to their measurements, make flat patterns from what i've draped (the picture below are some pieces for the dressing robe for The Drowsy Chaperone.)


Then i make a mock up with the pattern pieces. i make sure this fits their padded form, then we schedule a fitting with the actor(ess). 


It fit her brilliantly! 


I was telling my friend this yesterday but, when i have a fitting with someone and i have made a mock up from nothing but a measurement sheet and a rendering and it fits them perfectly, and is exactly what the designer wanted... ahhh... it just makes me feel like i really know what i'm doing. It's an amazing feeling. 


Here we were playing around with the pattern on the mock up. We traced the medallion pattern from the fashion fabric onto muslin with tracing paper and tracing wheels, then i cut it out so we could get a better idea of what the fabric "wanted to be..." (cue the crazy designer being crazy) we didn't end up liking the pattern going down the front and bottom edge like that. It wasn't really feasible doing appliques of chiffon on a chiffon bias cut skirt... without me killing myself. 


Here is the robe in the chiffon! It's lovely in person. Lovely, but i had to french seam everything, which takes at least twice as long. Yes it is very sheer. She is wearing it for a scene "show off" where she basically strips on stage. She wears pants and a swimsuit under the robe, and the pants rip off and then she dances around in the swimsuit. And it will be adorable. Sad that this robe is only worn for 5 seconds though... 


Here is the collar pinned on. It's supposed to still be kind of drapey, but i did interface and line it for some stability. The fabric is from london. Very deco, also very difficult to work with. chiffon doesn't lend itself to geometric prints well.... it's been a bit of a trial. 

It's even farther along today than when i took these pictures. I will post more as it progresses. 

Magic Hem!

I have a mentor, Louella, who is amazing. She has taught me all kinds of things. Things that have made  me a much better seamstress. One of those things that just makes me feel like i really know what I'm doing, and significantly lowered my stress-level when working with fabrics like chiffon, is the Magic Hem (aptly named). I search the Internet for sewing tips and stuff... because I'm like that, and i found a variation of the magic hem that i think actually improves it, so i will show you (shhh don't tell Louella i said that!) but really though. In building a dressing gown for Drowsy Chaperone i took pictures of the process. (p.s. this dressing gown is making me throw internal fits at the designer). here is the process. now you can hem chiffon like a pro!


First step: set your machine to like a 1.5 or 2 stitch length (tiny tiny!) and stitch along the finished edge line. I leave 1/4 inch seam allowance so that when i stitch this part i can just use the edge of the presser foot for the SA (seam allowance). 


See! Super tiny. This would be the worst to un-pick!


Second Step: fold along the stitching line so that the edge is what you just stitched, and the SA is folded to the back side of your fabric. 


Third Step: set your machine to a small zig-zag stitch. mine was like... a 2 and a 2 (length and width), but you can test out to see if you want different. You want it small and close together, but not too small. 
Now stitch along the folded edge! I keep the folded edge right in line with the center of my presser foot, where the needle would normally be stitching on a straight stitch, but since it's on zig-zag, your needle will be going right on either side. 


This picture better demonstrates what i was talking about. I'm still learning about macro settings on my camera... 


The last step i didn't really get a picture of, because it's my favorite part, and i got a little excited! Turn your fabric to the back side where you have that little flap of fabric that you folded over, and get out your sharpest fabric scissors! Trim off the excess as close to the zig-zag as you can get without cutting through any of the stitches. You can see in the picture above how it looks when you are finished. beautiful!! You might add a touch of Fray-Check of you are having an especially fray-tastic fabric (but i don't)

 Go Magic Hem your little heart out. I know i did. FYI i had to cut and re-hem all that i did in these pictures... gah! Hours wasted. Indecisive designers make me murderous!!  But for reals... everyone will think you are amazing. My boss for the summer thinks i'm brilliant because i do this hem and is having me teach her.